

Below is a table of all possible Mysteries that can be completed at each Dig Site. Beneath the table are the directions for each of the Mysteries in level order. Clicking the name of the Mystery in the table will take you down to the section which provides steps for that specific Mystery.
As a general rule, all the Archaeology level for all Mysteries can be boosted. The exception to this rule are Mysteries which require Research to complete them as you cannot boost to do Research.


*Cannot be boosted to complete this Mystery (Research involved)
- Requirements: 12 Archaeology
- Dig Site: Kharid-et
- Required Item(s):
- Third Age iron x 6
- Zarosian insignia x 2
- Rewards:
- 900 Archaeology experience
- Access to the Main Fortress
Completion of this Mystery will also complete the "Breaking the Seal" Achievement.
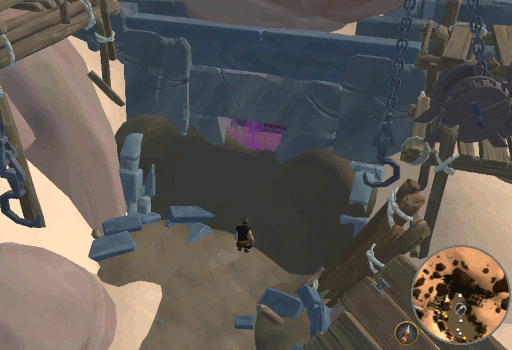
Click image to see partially excavated door area.
- Speak to Dr. Nabanik, just South West of the bank Outside of Kharid-et. He will give you a Centurion's seal (damaged).
- Repair the Centurion's seal (damaged) using the 6 Third Age iron and 2 Zarosian insignia to obtain a Centurion's seal.
- Clear the Fort debris in front of the dig site entrance. Once fully cleared, you will be able to see the triangular entrance.
- Click on the purple veiled entrance to use the seal on it and automatically enter the site.
Congratulations, Mystery complete!
- Requirements:
- 12 Archaeology
- Completetion of Breaking the Seal
- Dig Site: Kharid-et
- Required Item(s): Custodian's log page (1, 2, 3, & 4)
- Rewards:
- 900 Archaeology experience
- Access to the Prison Block
Completion of this Mystery will also complete the "Prison Block" Achievement. All pages are required to complete the Mystery.
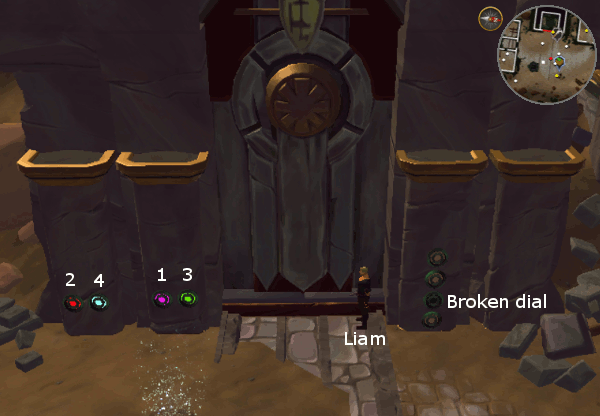
Click image to see door area.
- Excavate at one of the following Hotspots to obtain the log pages.
- Legionary remains (Level 12) - Main Fortress
- Castra debris (Level 17) - Main Fortress
- Administratum debris (Level 25) - Main Fortress
- Praesidio remains (Level 47) - Prison Block
- Carcerem debris (Level 58) - Prison Block
- When you have at least the first 2 pages, speak to Liam near the Prison door and he will give you a Kharid-et prison dial.
- Use the dial on the lock mechanism on the North side of the door. It is the 3rd circle from the top.
- With the dial repaired, walk to the buttons along the Southern side of the door and select them in the correct order:
- Shadow (Purple)
- Blood (Red)
- Smoke (Green)
- Ice (Cyan)
- Open the door and enter the prison.
- Collect any remaining pages.
Congratulations, Mystery complete!
- Requirements: 24 Archaeology
- Dig Site: Infernal Source
- Required Item(s):
- Founder's journal page (1, 2, 3, & 4)
- Crest of Dagon x3
- Crest of Dagon (damaged) x 3
- Goldrune x 28
- Orthenglass x 36
- Rewards:
- 1,300 Archaeology experience
- Access to the Dungeon of Disorder
All pages are required to complete the Mystery, however, it is not necessary to have them all in order to access the Dungeon.
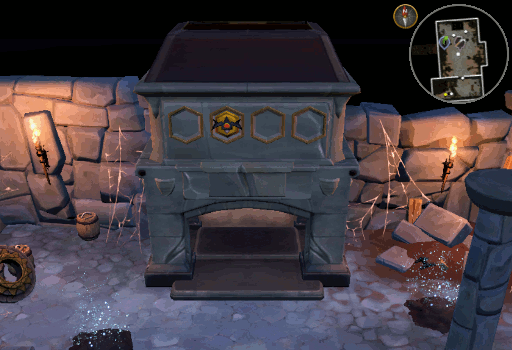
Click image to see the fireplace area.
- Interact with the fireplace on the Northern end of the Star Lodge Cellar.
- Excavate any of the Hotspots within the cellar to obtain the pages.
- Search the chests around the Cellar to obtain 1 fixed Crest of Dagon and 1 damaged crest. If you do not already have another damaged (or repaired) Crest of Dagon, Excavate the Lodge art storage until you obtain one.
- Visit a Workbench and repair your Crests of Dagon with 14 Goldrune and 18 Orthenglass each.
- With the 3 repaired Crests of Dagon in your inventory, interact with the fireplace to add them to the front. Note that this can be done with individual Crests as well.
- Once the crests have been placed, interact with the fireplace once more to open the entrance, then climb down the secret passage and enter the Dungeon of Disorder.
Congratulations, Mystery complete!
- Requirements: 29 Archaeology
- Dig Site: Infernal Source
- Required Item(s):
- Cultist diary page (1, 2, 3, & 4)
- Red candle x 3
- Chalk
- Rewards:
- 1,400 Archaeology experience
- Access to the Source
Completion of this Mystery will also complete the "Embrace the Chaos" Achievement. All pages are required to complete the Mystery.

Click image to see portal area.
- Excavate at one of the following Hotspots to obtain the diary pages.
- Cultist footlocker (Level 29)
- Sacrificial altar (Level 36)
- Dis dungeon debris (Level 45)
- Once you have obtained the pages, enter the North Eastern most room. Obtain 3 Red candles from the box of candles along the Northern wall and a piece of chalk from either box of chalk along the Southern walls.
- Add and light a candle in each candleholder and redraw the markings on the floor.
- With the ritual circle completed, you will now need to chant over each one of the candles:
- East - "Et Daemonium Renascitur"
- North - "Ceterum Aperuerit Inauam"
- West - "Ordo Animam Capit"
- This will open a red portal, enter it to reach the Source
Congratulations, Mystery complete!
- Requirements:
- 29 Archaeology
- 37 Prayer
- Completion of Eyes in Their Stars
- Completion of Embrace the Chaos
- Completion of Land of the Goblins
- Completion of Rocking Out or The Feud
- Dig Site: Infernal Source
- Required Item(s):
- Bacon
- Dog
- Dragon bones
- Alternatively Babydragon bones will work
- Fake beard
- Alternatively, the Santa beard or Desert disguise will work.
- Keepsakes and cosmetics will NOT work.
- Frog spawn
- Goblin potion
- Harlequin cow
- Alternatively, you can bring a Chocolate, Strawberry, and Vanilla cow.
- Red dye
- Self-harm item
- Rewards: 1,400 Archaeology experience
Completion of this Mystery will also complete the "Dagon Bye" Achievement. Interaction with the Gargoyles can be completed in any order and do not need to be completed consecutively. You are free to do them all at once or over a longer period of time, however, you must speak with Ophiuchus to begin the mystery. See the Infernal Source guide for the location of each gargoyle.
When first interacting with the portals, you will receive an associated Zodiac coin (along with 100 Archaeology experience) and after speaking with the Gargoyle you will obtain a page of ramblings. Be sure you have empty spaces for these items as well as any equipment you need to remove in order to become a goblin for Farfarello (Aquarius). Note that both the coins and the pages can be destroyed as soon as you finish interacting with each Gargoyle; coins can be reclaimed from Movario and the pages can be read in your Archaeology journal.
| Zodiac | Gargoyle Name | Ramblings Page | Item/Action | Steps |
| Aries | Cagnazzo | Sequence 1 | Dog | Enter the portal with your dog following behind you. |
| Taurus | Libicocco | Sequence 2 | Angry emote | Use the Angry emote, enter the portal, and use the angry emote again. |
| Gemini | Alichino | Sequence 3 | Harlequin cow | Enter the portal. Alichino will claim and eat your cow. |
| Cancer | Rubicante | Sequence 4 | Red dye | Enter the portal, speak to Rubicante, and dye him red. |
| Leo | Graffiacane | Sequence 5 | Self-harm item | Ensure that you do not have full health and enter the portal. |
| Virgo | Ciriatto | Sequence 6 | Bacon | Enter the portal and feed Ciriatto your Bacon. |
| Libra | Scarmiglione | Sequence 7 | Raspberry emote | Use the Raspberry emote, enter the portal, and use the Raspberry emote again. |
| Scorpio | Malacoda | Sequence 8 | Frog spawn | Enter the portal. Malacoda will claim your Frog spawn. |
| Sagittarius | Calcabrina | Sequence 9 | Overhead Prayer active | Activate any overhead Prayer/Curse, enter the portal, and speak with Calcabrina. |
| Capricorn | Barbariccia | Sequence 10 | Fake beard | Equip your disguise, enter the portal, and speak with Barbariccia. |
| Aquarius | Farfarello | Sequence 11 | Goblin potion | Unequip all items, consume a dose of Goblin potion to become a goblin, enter the portal, revert to human form, and speak with Farfarello. |
| Pisces | Draghignazzo | Sequence 12 | Dragon bones | Enter the portal. Draghignazzo will claim your Dragon bones. |
Once you have interacted with all 12 Gargoyles, you will need to speak with Ophiuchus again.
Congratulations, Mystery complete!
- Requirements:
- 40 Archaeology
- Assistant Qualification
- Dig Site: Varrock
- Required Item(s): None
- Rewards:
- 2,000 Archaeology experience
- More energy from the Monolith for Relics (+100)
Completion of this Mystery will also complete the "Secrets of the Monolith" Achievement.
- Once you have completed the requirements for the Assistant Qualification, speak with Acting Guildmaster Reiniger.
- A cutscene of your graduation will occur wherein Reiniger congratulates you on your progress while at the Monolith.
Congratulations, Mystery complete!
- Requirements: 40 Archaeology
- Dig Site: Everlight
- Required Item(s):
- Icyene remains
- 'Frying pan'
- 'Frying pan' (damaged)
- Third Age iron x 20
- White marble x 24
- Rewards: 2,100 Archaeology experience
Completion of this Mystery will also complete the "Fallen Angels" Achievement.
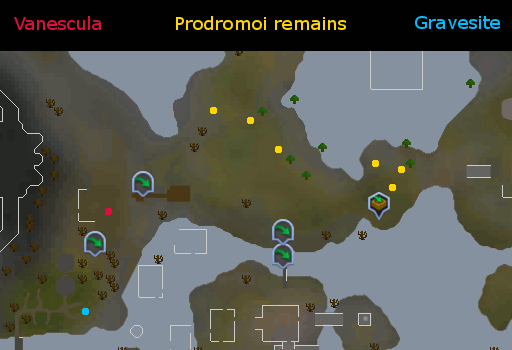
- Excavate at Prodromoi remains (Level 42) to obtain Icyene remains.
- Speak with Vanescula Drakan, located just outside the Dig Site. She will mention that Icyene remains were buried with items that looked like frying pans.
- If you do not have a 'Frying pan', continue to Excavate at Prodromoi remains until you obtain a damaged one to repair with 20 Third Age iron and 24 White marble.
- Once you have obtained a repaired 'Frying pan', climb down the shortcut South of Vanescula. Down here you will discover a small rectangular grave that is empty. Click the grave to rebury the Icyene remains.
- Return to Vanescula Drakan and speak with her once more.
Congratulations, Mystery complete!
- Requirements: 42 Archaeology
- Dig Site: Everlight
- Required Item(s): Queen's journal page (1, 2, 3, & 4)
- Rewards: 2,100 Archaeology experience
Completion of this Mystery will also complete the "Queen of the Icyene" Achievement.

- Excavate at one of the following Hotspots to obtain the journal pages.
- Prodromoi remains (Level 42)
- Monoceros remains (Level 48)
- Once you have collected all 4 pages, speak with Vanescula Drakan, Outside the dig site.
Congratulations, Mystery complete!
- Requirements:
- 47 Archaeology
- Completion of Prison Break
- Dig Site: Kharid-et
- Required Item(s):
- Rewards:
- 2,800 Archaeology experience
- Access to the Vault
Completion of this Mystery will also complete the "Time Served" Achievement.

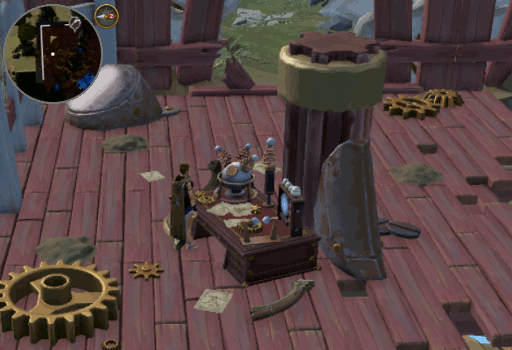
Click image to see the controller area.
- Excavate at Prasidio remains Hotspots until you obtain an Ancient timepiece (damaged).
- Repair the time piece using 18 Ancient vis, 12 Goldrune, and 16 Imperial steel.
- Use the Ancient timepiece on the cell controller at the North end of the Prison Block to unlock the Vault door to the East.
Congratulations, Mystery complete!
- Requirements: 61 Archaeology
- Dig Site: Everlight
- Required Item(s): Athlete's journal page (1, 2, 3, 4, & 5)
- Rewards: 5,100 Archaeology experience
Completion of this Mystery will also complete the "Fall and Rise" Achievement.
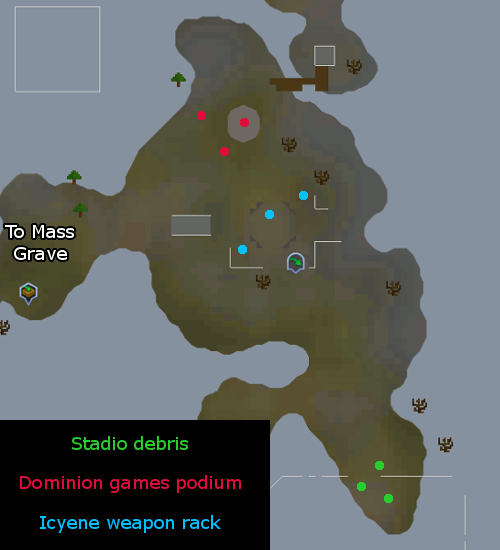
- Excavate at one of the following Hotspots to obtain the journal pages.
- Stadio debris (Level 61)
- Dominion games podium (Level 69)
- Icyene weapon rack (Level 100)
- Once you have collected all 5 pages, speak with Vanescula Drakan, Outside the dig site.
Congratulations, Mystery complete!
- Requirements: 66 Archaeology
- Dig Site: Senntisten
- Required Item(s):
- A warning letter
- A scrawled note
- A badly written message
- The message in the box
- A bloodstained note
- Investigator's note
- Rewards: 7,300 Archaeology experience
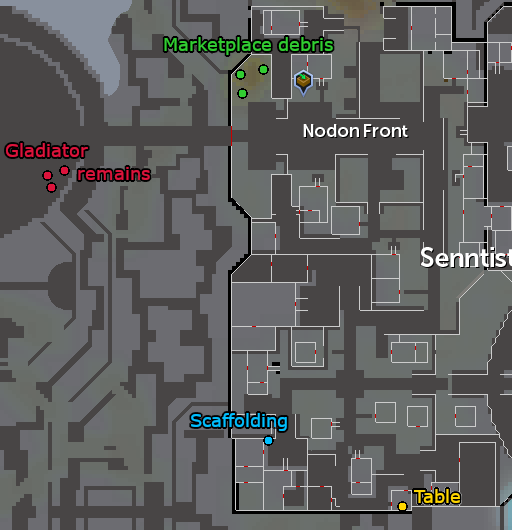
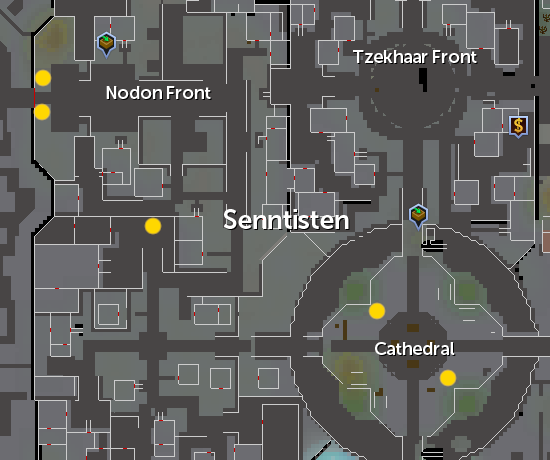
- Excavate at the following Hotspots to obtain the journal pages.
- Marketplace debris (Level 63) - A Warning letter
- Gladiator remains (Level 66) - A scrawled note
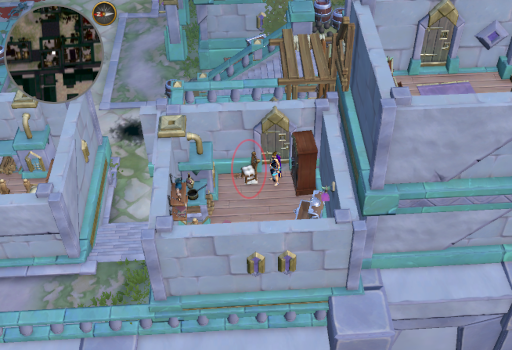
- Once you have collected both pages, visit the house East of where Naressa is found and study the table to obtain A badly written note and unlock the Complete the Pattern, Solve the Puzzle Research.
- Complete the newly unlocked Research and obtain The message in the box.
- Once it is complete, speak with Intern Jimmy.
- Excavate the Marketplace debris again to obtain A bloodstained note.
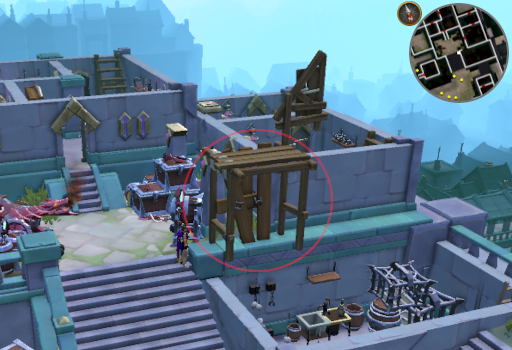
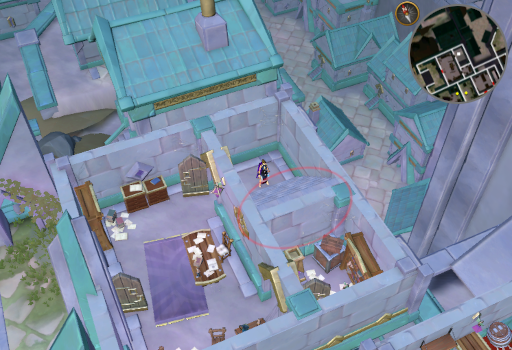
- After you have obtained the page, head to the scaffolding in the South West cornor of the Nodon front and click it to "Squeeze through" to the otherside.
- Investigate the Investigator's notes beneath the chair to obtain the Investigator's note.
Congratulations, Mystery complete!
- Requirements: 67 Archaeology
- Dig Site: Senntisten
- Required Item(s): A critic's review (article 1, 2, 3, 4, 5)
- Rewards: 7,800 Archaeology experience
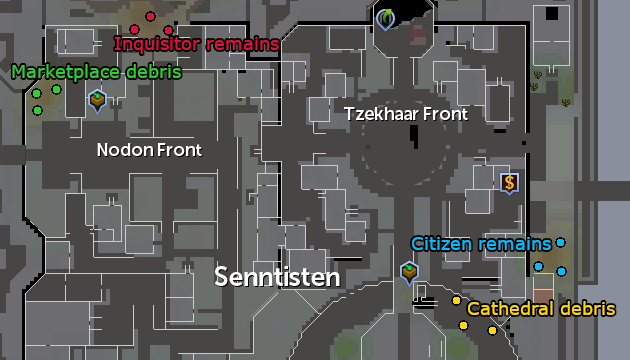
- Excavate at the following Hotspots to obtain the articles.
- Article 1 - Cathedral debris (Level 62)
- Article 2 - Cathedral debris (Level 62)
- Article 3 - Inquisitor remains (Level 64)
- Article 4 - Marketplace debris (Level 63)
- Article 5 - Citizen remains (Level 67) - Also requires completion of Crossing the Bridge Research (partial completion of Secrets Of The Inquisition) to access area
- Once you have collected all 5 pages, speak with Intern Jimmy, outside the dig site.
Congratulations, Mystery complete!
- Requirements: 67 Archaeology
- Dig Site: Senntisten
- Required Item(s):
- Funerary urn of blood
- Funerary urn of blood (damaged)
- Blood of Orcus x 20
- Soapstone x 30
- Tyrian purple x 14
- Funerary urn of ice
- Funerary urn of ice (damaged)
- Ancient vis x 20
- Soapstone x 28
- Tyrian purple x 14
- Funerary urn of smoke
- Funerary urn of smoke (damaged)
- Ancient vis x 20
- Soapstone x 26
- Tyrian purple x 14
- Funerary urn of shadow
- Funerary urn of shadow (damaged)
- Ancient vis x 20
- Soapstone x 28
- Tyrian purple x 14
- Inquisitor's Memoirs (page 1, 2, 3, 4, 5, 6, 7, 8, 9)
- Funerary urn of blood
- Rewards:
- 7,800 Archaeology experience
- Aurelius's Mask
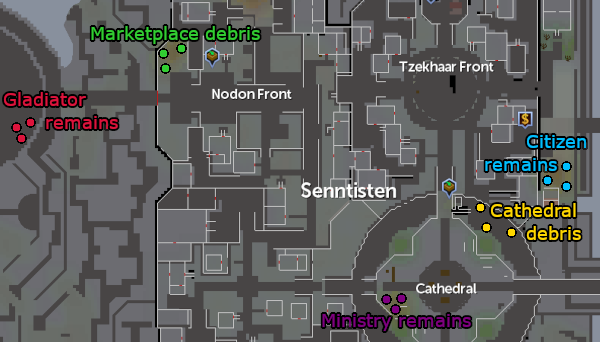
- Excavate at the following Hotspots to obtain the first 2 pages and each of the urns.
- Page 1 and Funerary urn of shadow (damaged) - Ministry remains (Level 60)
- Page 2 and Funerary urn of smoke (damaged) - Cathedral debris (Level 62)
- Funerary urn of ice (damaged) - Marketplace debris (Level 63)
- Funerary urn of blood (damaged) - Gladiator remains (Level 66)
- Restore all of the urns.
- Activate one of the Statues by interacting with it while holding the restored urns - Blood, Ice, Shadow, Smoke (urns will be consumed).
- Excavate at the Inquisitor remains Hotspot to obtain the 3rd and 4th pages - these pages can be obtained before activating the statue.
- Go to the Inquisition Headquarters and climb to the stairs to the 2nd floor.
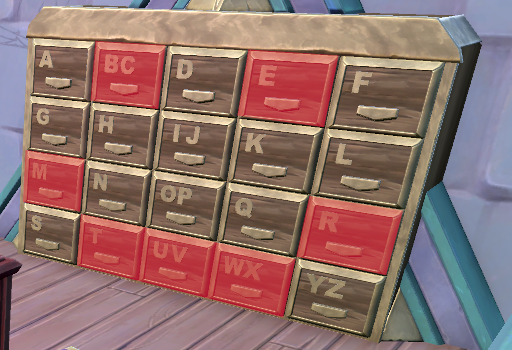
- Open drawers BC - E - M - R - T - UV - WX to create a smiley face. This will give you Page 5.
- Go to Intern Jimmy and study the scaffolding North East of him. This will give you access to the Crossing that Bridge Research.
- Go to the Exam Centre and complete the research.
- Once done, you can squeeze past the scaffolding to access the Citizen remains Hotspots. Excavate Citizen remains to obtain Pages 6 and 7 and the Ministry remains to obtain Page 8.
- After obtaining all 3 pages, go to the Cathedral and activate the statues
- North West statue: Vincit qui se vincit. (chat option 3)
- South East statue: Oderint dum metuant. (Chat option 4)
- This will open a secret chamber. Enter it and speak with Aurelius to receive Page 9 and the Aurelius's Mask relic.
Congratulations, Mystery complete!
- Requirements:
- 68 Archaeology
- Completion of Contract Claws
- Dig Site: Infernal Source
- Required Item(s): Chaos star
- Rewards:
- 8,400 Archaeology experience
- Access to Ancient Summoning
Completion of this Mystery will also complete the "Dagon Bye" Achievement.
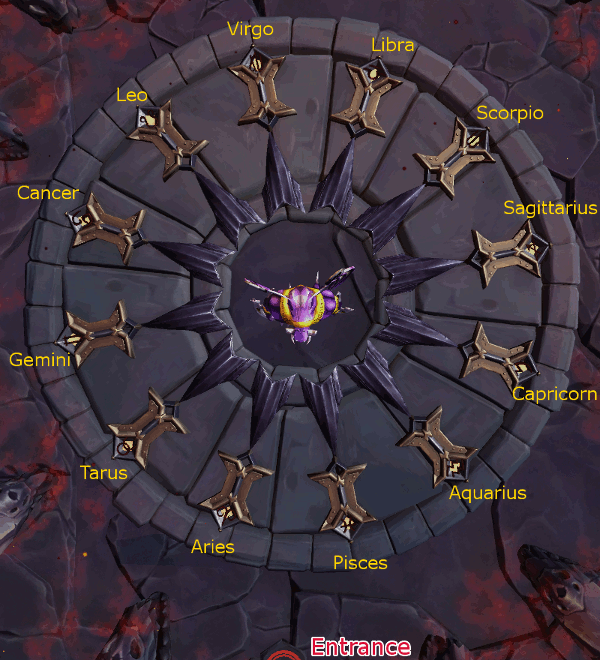
- Travel to the very center of the Infernal Source and speak with Dagon the Gatekeeper to obtain a Zodiac code to solve the puzzle of his binding.
- Adding the Chaos star to your toolbelt is suggested to save inventory space.
- Select the section of the gate surrounding him that corresponds to the zodiac signs as listed below. Note that as you make your selection, several of the other signs will no longer be available to select and those available will change with each new choice you make.
- Libra
- Virgo
- Scorpio
- Aquarius
- Libra
- Pisces
- Virgo
- Aries
- Sagittarius
- Pisces
- Capricorn
- Aquarius
- Aquarius
- Once you have freed Dagon, speak with him once again to sign his pact and learn the ways of Ancient Summoning.
Congratulations, Mystery complete!
- Requirements: 70 Archaeology
- Dig Site: Stormguard Citadel
- Required Item(s): Exile's vow
- Rewards: 9,300 Archaeology experience
Completion of this Mystery will also complete the "Atonement" Achievement.
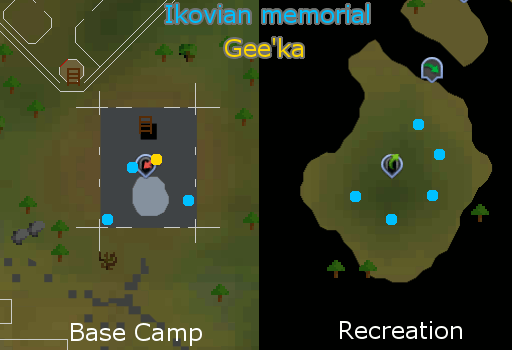
- Excavate at Ikovian memorial Hotspots to obtain the page.
- Once you have obtained it, speak with Gee'ka, Outside the dig site.
Congratulations, Mystery complete!
- Requirements: 70 Archaeology
- Dig Site: Stormguard Citadel
- Required Item(s):
- Boots of Flight
- Ikovian gerege
- Rewards: 9,300 Archaeology experience
Completion of this Mystery will also complete the "Leap of Faith" Achievement.
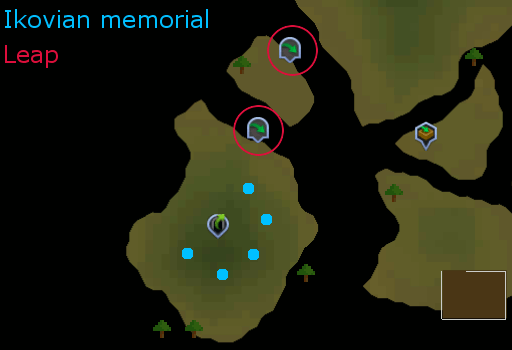
- This Mystery will begin the first time you speak with Gee'ka. If you have not yet obtained an Ikovian gerege, Excavate at Ikovian memorial Hotspots until you recieve one and repair it with 36 Third Age iron and 30 Wings of War. It is recommended, though not required, to add this item to your toolbelt.
- Enter the portal and Excavate at Ikovian memorial Hotspots around the portal until you obtain Boots of Flight.
- Add these to your toolbelt and cross the 2 gaps to the North East.
Congratulations, Mystery complete!
- Requirements: 72 Archaeology
- Dig Site: Everlight
- Required Item(s): Tetrarch's journal page (1, 2, 3, & 4)
- Rewards: 10,000 Archaeology experience
Completion of this Mystery will also complete "The Dour of Bable" Achievement.

- Excavate at one of the following Hotspots to obtain the journal pages.
- Oikos studio debris (Level 72)
- Oikos fishing hut remains (Level 84)
- Once you have obtained it, speak with Vanescula Drakan, Outside the dig site.
Congratulations, Mystery complete!
- Requirements:
- 74 Archaeology
- Completion of Prison Break
- Dig Site: Kharid-et
- Required Item(s):
- Pater's log page (1, 2, & 3)
- Pontifex signet ring (suggested if level 81 or higher, toolbelt will work)
- Rewards: 11,000 Archaeology experience
Completion of this Mystery will also complete "The Cult of Orcus" Achievement.
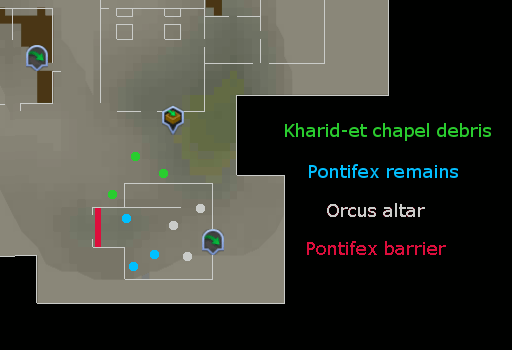
- Excavate at one of the following Hotspots to obtain the journal pages.
- Kharid-et chapel debris (Level 74)
- Pontifex remains (Level 81)
- Orcus altar (Level 86)
- Once you have obtained the journal pages, speak with Dr. Nabanik, Outside the dig site.
Congratulations, Mystery complete!
- Requirements: 76 Archaeology
- Dig Site: Stormguard Citadel
- Required Item(s):
- Mission Report: Everlight Silvthril
- Mission Report: Hellfire Metal
- Mission Report: Warforged Bronze
- Rewards: 12,000 Archaeology experience
Completion of this Mystery will also complete "The Spy Who Loved Metal" Achievement.
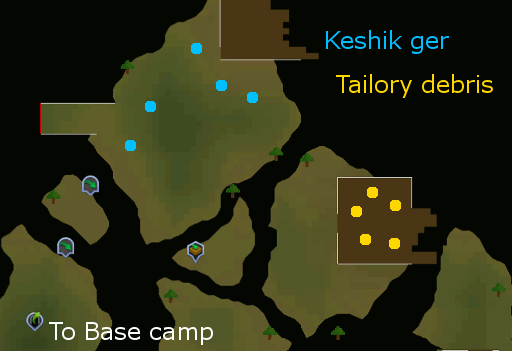
- Excavate at one of the following Hotspots to obtain the journal pages.
- Keshik ger (Level 76)
- Tailory debris (Level 81)
- Once you have obtained the journal pages, speak with Gee'ka, Outside the dig site.
Congratulations, Mystery complete!
- Requirements: 76 Archaeology
- Dig Site: Stormguard Citadel
- Required Item(s):
- Wingsuit v1 (broken)
- Armadylean yellow x 1
- Leather scraps x 20
- Samite silk x 40
- Stormguard steel x 9
- Rewards:
- 12,000 Archaeology experience
- Ability to upgrade to Wingsuit v3
Completion of this Mystery will also complete the "Wing Out" Achievement.
- Obtain the Wingsuit v1 (broken) from the Northern most building on Recreation island. Repair the suit using 1 Armadylean yellow, 20 Leather scraps, 40 Samite silk, and 9 Stormguard steel. Once repaired, it is highly suggested to add it to your toolbelt.
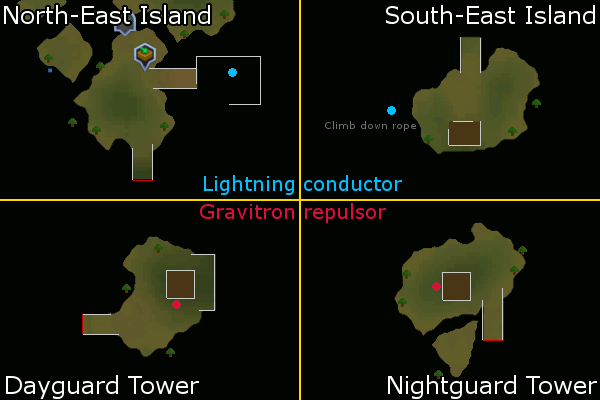
- With your newfound ability to fly, leap from the bridge and travel to the North-West island. Once here, walk to the Eastern building and climb down the rope. On the lower floor, interact with the Lightning conductor box on the North side of the column then climb back up the rope and take to flight again.
- Travel now to the South-East island and climb down the rope to the West. Along the Northern edge of the ledge you will find another Lightning conductor. Interact with it and you will finish upgrading your wingsuit to v2. Climb back up the rope and leap from the bridge edge again.
- Travel to the Dayguard Tower - passing the lightning defence will complete the Mystery, continue to complete the upgrade to v3. Here you will find a Gravitron repulsor along the Southern edge of the tower. Interact with it to add it to your wingsuit then leap from bridge for the final time on this mystery.
- This time you will travel to the Nightguard Tower. Once again, the Gravitron repulsor will be found along the tower, however, this time it will be along the West side. Interact with the repulsor and you will add the final upgrade to your wingsuit creating a wingsuit v3.
Congratulations, Mystery complete (and wingsuit fully upgraded)!
- Requirements: 76 Archaeology
- Dig Site: Warforge
- Required Item(s):
- Hob-da-Gob
- Chained Heat
- It a Knockout
- Nosorog Horn Toss
- First Chosen
- Rewards: 12,000 Archaeology experience
Completion of this Mystery will also complete "The First Commander" Achievement.
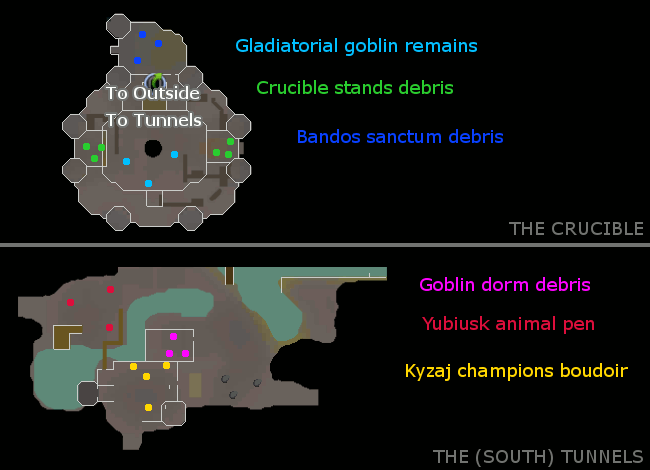
- Excavate at one of the following Hotspots to obtain the books.
- Gladiatorial goblin remains (Level 76) - The Crucible
- Crucible stands debris (Level 81) - The Crucible
- Goblin dorm debris (Level 83) - South Tunnels
- Yubiusk animal pen (Level 94) - South Tunnels
- Kyzaj champions boudoir (Level 100) - South Tunnels
- Bandos sanctum debris (Level 115) - Bandos' Sanctum
- Once you have obtained the pages, speak with Zanik, Outside the dig site.
Congratulations, Mystery complete!
- Requirements: 83 Archaeology
- Dig Site: Warforge
- Required Item(s): None
- Rewards: 16,000 Archaeology experience
Completion of this Mystery will also complete the "Out of the Crucible" Achievement.
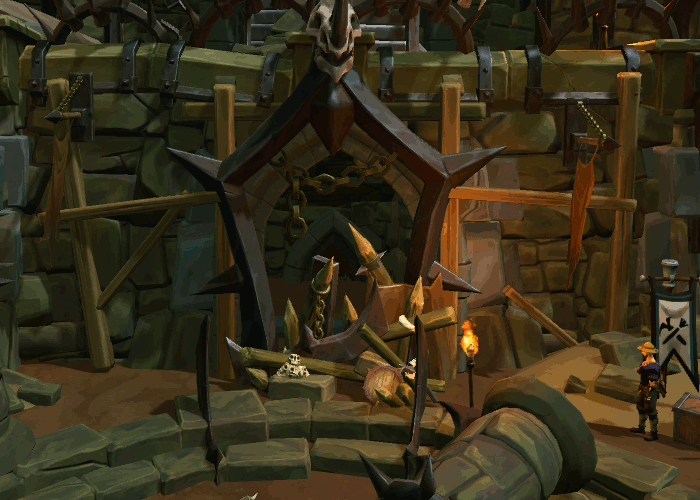
Click image to see barrier area.
- Click on the baracade on the lower section of the Crucible, beneath the throne. This step will begin the Mystery and can be done prior to level 83.
- Excavate the barricade until cleared. If boosting, you will need to consume several Soil teas (at least 4). Soils and Materials will be obtained as per usual.
- Once cleared, enter the tunnel by choosing either the Left or Right path.
Congratulations, Mystery complete!
- Requirements:
- 83 Archaeology
- 35 Dungeoneering
- 28 Fishing
- Completion of Out of the Crucible
- Dig Site: Warforge
- Required Item(s): Several keys (see below)
- Rewards:
- 21,000 Archaeology experience
- 8,000 Dungeoneering experience
Completion of this Mystery will also complete the "Into the Forge" Achievement. Each of the keys are obtained by performing specific actions within Warforge as seen below. Note that some actions may rapidly provide you with the key while others will take some time.
- Dorgeshuun key - Already located at the Forge door.
- Drogokishuun key - Enter the tunnels from both the Left and Right direction.
- Requires 35 Dungeoneering
- Rekeshuun key - Enter the North Western tunnel.
- Narogoshuun key - Enter the Western tunnel.
- Ekeleshuun key - Enter the South Eastern tunnel.
- Idithuun key - Enter the South Western tunnel.
- Excavate
- Garagorshuun key - Catch Raw cave eel, Slimy eel, and/or Raw cavefish from the river. Requires 28 Fishing.
- Thorobshuun key - Mine: Copper ore, Tin ore, and/or Necrite ore.
- Yurkolgokh key - Attempt to open the Southern forge doors, near the Goblin dorm debris.
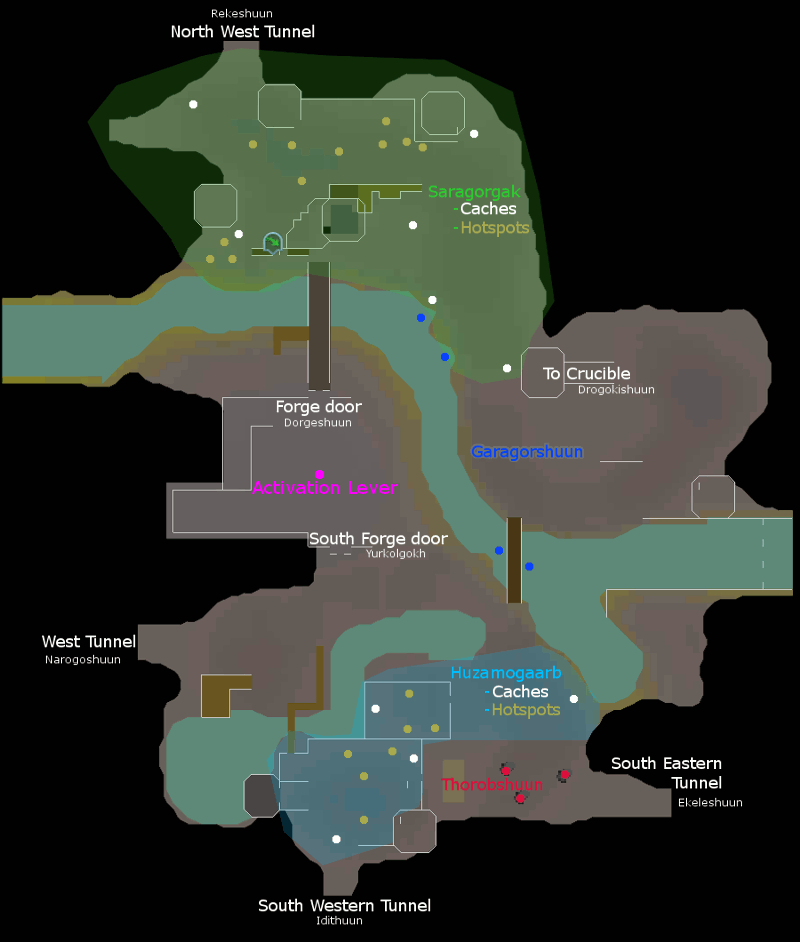
Keys can be added all at once or one at a time to the Northern forge door. Once all keys have been added, the door will open for you, simply pull the lever in the center of the room to activate the forge.
Congratulations, Mystery complete!
- Requirements: 85 Archaeology
- Dig Site: Stormguard Citadel
- Required Item(s):
- Project Blackfire
- Project Night Owl and Hawkeye
- Project Carina
- Project Talon
- Project Woodpecker
- Rewards: 18,000 Archaeology experience
Completion of this Mystery will also complete "A Study in Aether" Achievement. All books are required to complete the Mystery.
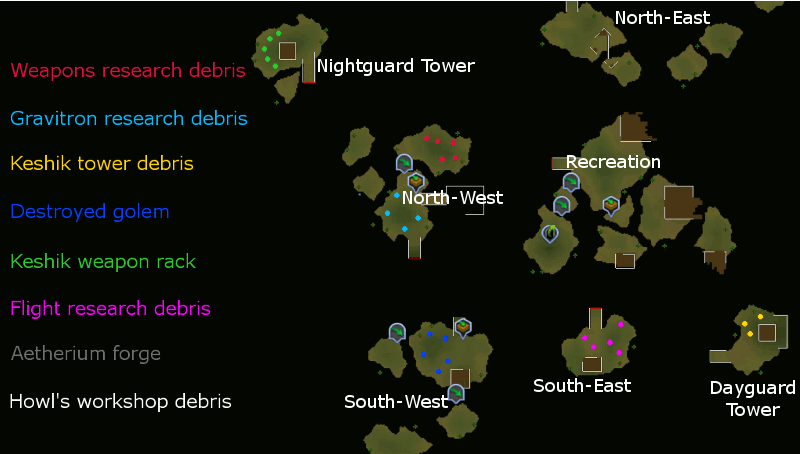
- Excavate at one of the following Hotspots to obtain the books.
- Weapons research debris (Level 85) - North-West Island
- Gravitron research debris (Level 91) - North-West Island
- Keshik tower debris (Level 95) - Dayguard Tower
- Destroyed golem (Level 98) - South-West Island
- Keshik weapon rack (Level 103) - Nightguard Tower
- Flight research debris (Level 111) - South-East Island
- Aetherium forge (Level 112) - Howl's Workshop
- Howl's workshop debris (Level 118) - Howl's Workshop
- Once you have obtained the Books, speak with Gee'ka, Outside the dig site.
Congratulations, Mystery complete!
- Requirements: 89 Archaeology
- Dig Site: Warforge
- Required Item(s): Forge War!
- Rewards: 21,000 Archaeology experience
Completion of this Mystery will also complete the "Forge War!" Achievement.
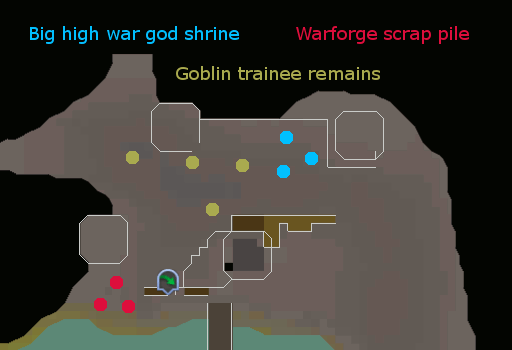
- Excavate at one of the following Hotspots to obtain the book.
- Big high war god shrine (Level 89)
- Goblin trainee remains (Level 97)
- Warforge scrap pile (Level 104)
- Once you have obtained the books, speak with Zanik, Outside the dig site.
Congratulations, Mystery complete!
- Requirements: 90 Archaeology
- Dig Site: Orthen
- Required Item(s):
- Foothold
- On Varanusaurs
- Rumours of the Raksha
- The Greatest Hunt
- Rewards: 21,500 Archaeology experience
Completion of this Mystery will also complete "Crypt o' Zoology" Achievement.
- Excavate at one of the following Hotspots to obtain the pages.
- Varanusaur remains (Level 90)
- Dragonkin reliquary (Level 96)
- Dragonkin coffin (Level 99)
- Once you have obtained the pages, speak with Mr. Mordaut, at the Anachronia Base Camp.
Congratulations, Mystery complete!
- Requirements: 90 Archaeology
- Dig Site: Orthen
- Required Item(s): None
- Rewards:
- 21,500 Archaeology experience
- Access to Moksha Ritual Site
Completion of this Mystery will also complete "Know Thy Measure" Achievement. It is suggested to complete (or at least begin) the "Incomplete Portal Network II" Research before starting this Mystery. 20 unnoted Orthenglass will be necessary if you choose to do so.
- Travel to the Observation Outpost and interact with the pylon in the South East corner.
- Note that hovering over the symbols will tell you what number (1 though 8) they each represent. Cycle through them by clicking the symbol until you complete the following patterns one at a time. Once completing a solution, the pylon will beep to inform you that you can progress.
Solution Image 3, 1, 5 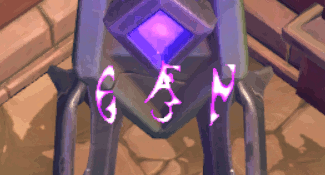
4, 1, 4 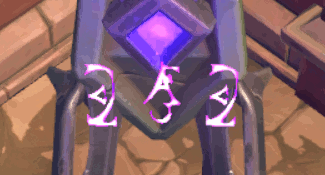
1, 6, 7 
- When the symbols disappear after completing the final code, you will need to complete the conversation to discover a Strange device tucked behind the pylon.
- Inspect the device to view a cut scene just outside the Moksha Ritual Site.
- If you have completed the "Incomplete Portal Network II" Research, you will want to bring 20 unnoted Orthenglass and travel to the Moksha Ritual Site. Note that it is not required to have completed the Research, just highly advised so you can unlock the teleportation device at the same time.
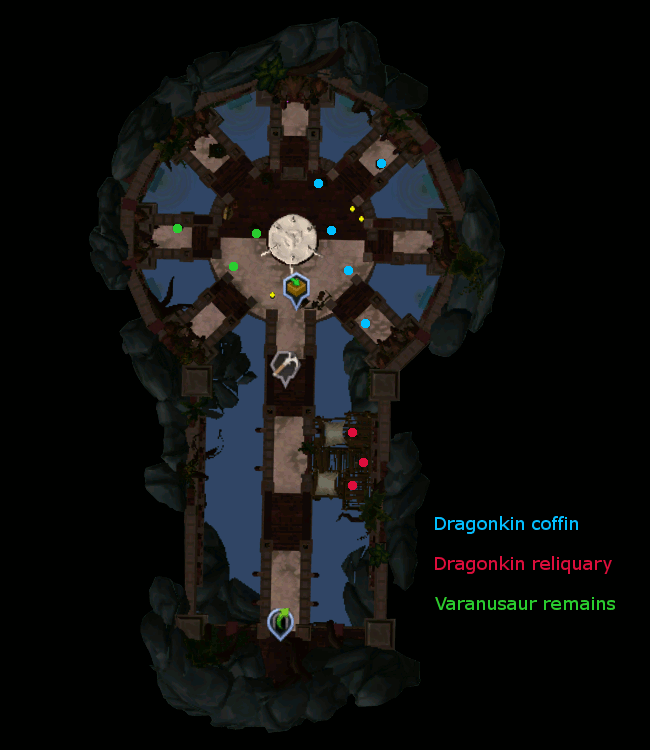
- Once outside of the Moksha Ritual Site, interact with the Dragonkin statue to the North.You will need to choose the code phrase based on what you saw in the vision from the Strange device. These will be options 1, 2, 3, and 4 - in order (Sha, Cra, Lith, and Kab).
- Selecting the correct phrase will cause the same symbols from the pylon to appear on the wall. Once again you will need to cycle through the symbols to input the solutions.
Solution Image 5, 1, 6 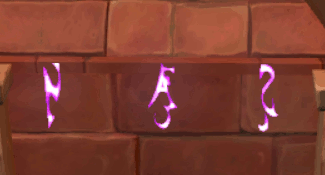
4, 1, 8 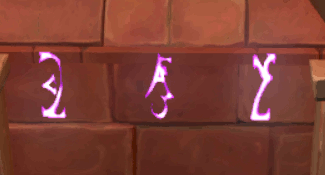
5, 1, 4 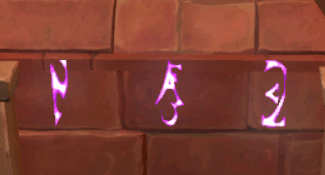
- Completing the final solution will once again cause the symbols to disappear. This time, however, the wall infront of you will open up and grant you access to the Moksha Ritual Site. Enter the opening and descend into the site.
Congratulations, Mystery complete!
Use the 20 unnoted Orthenglass on the teleportation device to the East of the door to activate it and unlock the "Incomplete Portal Network III" Research.
- Requirements:
- 90 Archaeology
- 70 Crafting
- 70 Divination
- 70 Runecrafting
- Completion of Know Thy Measure
- Completion of "Incomplete Portal Network I-III" Research
- Anachronia Base Camp Teleportation Device unlocked
- Dig Site: Orthen
- Required Item(s):
- 20 unnoted Ancient vis (unlock Outpost device)
- 20 unnoted Orthenglass (unlock Moksha device)
- 20 unnoted Quintessence (unlock Xolo City device)
- Rewards:
- 3,000 Divination experience (unlock Crypt device)
- 3,000 Runecrafting experience (unlock Outpost device)
- 3,000 Crafting experience (unlock Moksha device)
- 3,000 Divination experience (unlock Xolo City device)
- 35,000 Archaeology experience (completion)
Completion of this Mystery will also complete "Teleport Node On" Achievement.
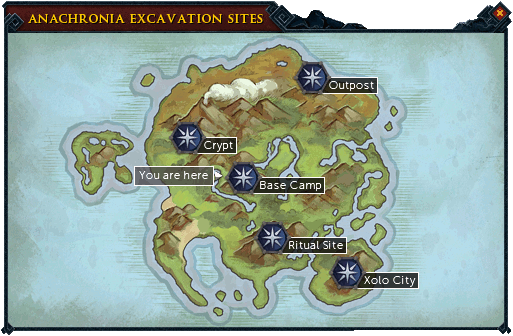
Click image to see teleport locations.
Requires: Nothing
Instructions:
- Travel to the Crypt of Varanus site.
- Click on the teleportation device outside of the excavation area (West of the door).
- The device will now be activated and earn you 3,000 Divination experience as well as the ability to complete the "Incomplete Portal Network I" Research.
Requires:
- Completion of "Incomplete Portal Network I" Research
- 20 unnoted Ancient vis
- 70 Runecrafting
Instructions:
- Travel to the Observation Outpost site after completion of the Research mission.
- Click on the teleportation device outside of the excavation area (South West of the door) with 20 unnoted Ancient vis.
- The device will now be activated and earn you 3,000 Runecrafting experience as well as the ability to complete the "Incomplete Portal Network II" Research.
Requires:
- Completion of "Incomplete Portal Network II" Research
- Completion of Know Thy Measure
- 20 unnoted Orthenglass
- 70 Crafting
Instructions:
- Travel to the Moksha Ritual Site after completion of the Research mission and Mystery.
- Click on the teleportation device inside of the excavation area (East of the door) with 20 unnoted Orthenglass.
- The device will now be activated and earn you 3,000 Crafting experience as well as the ability to complete the "Incomplete Portal Network III" Research.
Requires:
- Completion of "Incomplete Portal Network III" Research
- 20 unnoted Quintessence
- 70 Divination
Instructions:
- Travel to the Xolo City site after completion of the Research mission.
- Click on the teleportation device outside of the excavation area (West of the door/stairs) with 20 unnoted Quintessence.
- The device will now be activated and earn you 3,000 Crafting experience and 35,000 Archaeology experience.
Congratulations, Mystery complete!
- Requirements: 92 Archaeology
- Dig Site: Everlight
- Required Item(s): Epic of Hebe (excerpt 1, 2, 3, 4, & 5)
- Rewards: 23,000 Archaeology experience
Completion of this Mystery will also complete "The Epic of Hebe" Achievement.
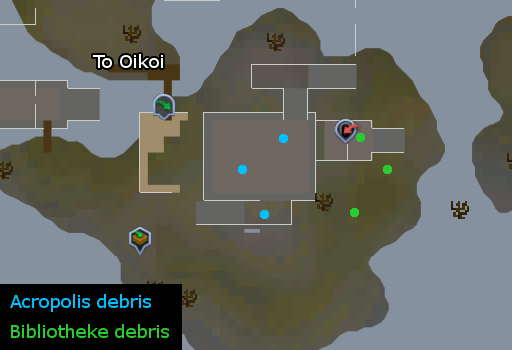
- Excavate at one of the following Hotspots to obtain the pages.
- Acropolis debris (Level 92)
- Bibliotheke debris (Level 109)
- Once you have obtained the pages, speak with Vanescula Drakan, Outside the dig site.
Congratulations, Mystery complete!
- Requirements:
- 95 Archaeology
- Completion of Wing Out
- Dig Site: Stormguard Citadel
- Required Item(s):
- Wingsuit v3
- Stormguard gerege
- Rewards:
- 23,000 Archaeology experience
- Access to Ancient Invention
- Ability to make Blueprints from Torn blueprint fragments
Completion of this Mystery will also complete the "Howl's Floating Workshop" Achievement.
- With the Wingsuit v3 and Stormguard gerege either in your inventory or on your toolbelt, interact with the gravetational core between the North-West and South-West islands.
- Search the Drafting bench to unlock the "Back to the Drawing Board" Research.
- Travel to the Varrock Dig site and set your team off to complete the "Back to the Drawing Board" Research project. The base time for completin of this project is 34 minutes.
- Once the team has returned and you have checked the report, return to Howl's workshop and investigate the bench again.
Congratulations, Mystery complete!
- Requirements:
- 99 Archaeology
- Guildmaster Qualification
- Completion of Eyes in Their Stars
- Completion of Into The Forge
- Completion of Time Served
- Partial completion of Hallowed Be...
- Dig Site: Varrock Dig Site
- Required Item(s):
- Wingsuit v1
- Master archaeologist's outfit
- Rewards: 35,000 Archaeology experience
Completion of this Mystery will also complete the "Writings on the Walls" Achievement.
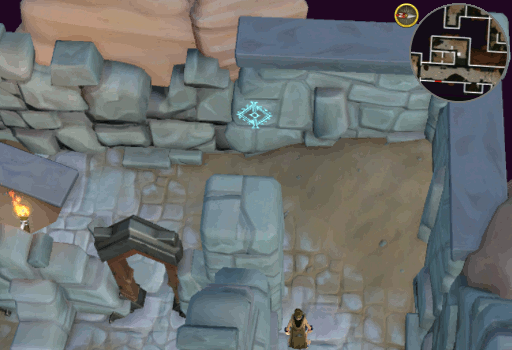
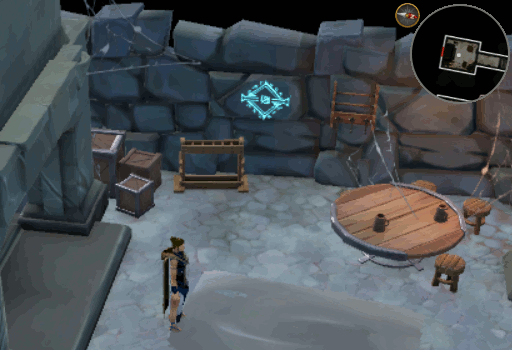
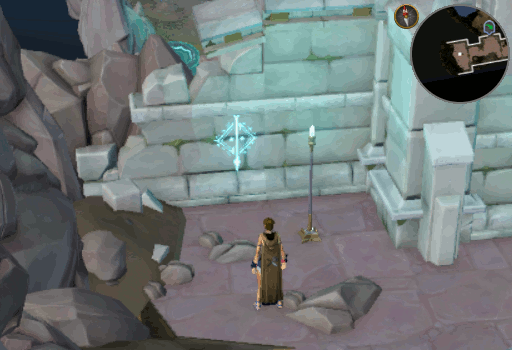
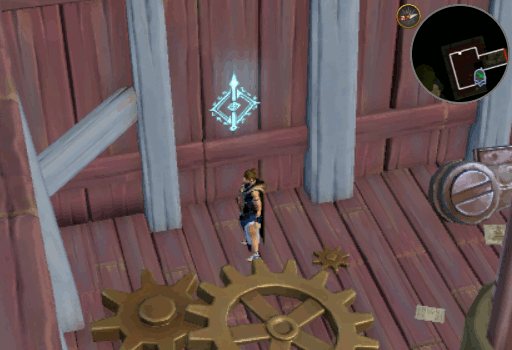
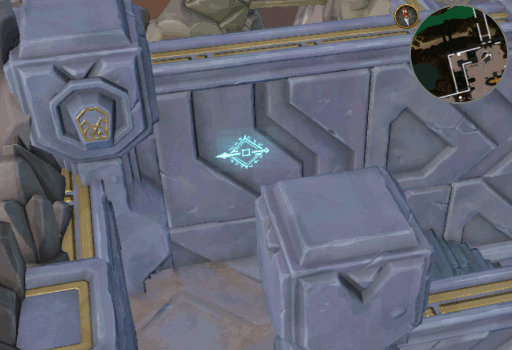
- Once you have obtained the Guildmaster Qualification and are wearing the Master archaeologist's outfit, you will be able to see a special mark on the wall at each Digsite. Investigate it at each one. Images below can be clicked to see an in game view of the symbol's location.
Dig Site Location Map Kharid-et On the Eastern wall in the room South East of the Strange device (Xil'gar Trog) 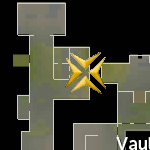
Infernal Source To the West of where you enter the Dungeon 
Everlight At the West end of the Cavern, on the North wall 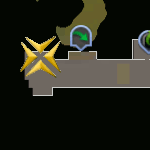
Stormguard Citadel Along the East wall in the same room you find the Lighting conductor on the North-West Island 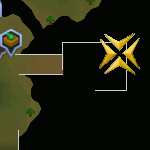
Warforge On the North wall of the stairs within the Forge 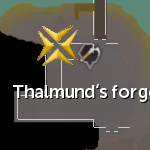
- Once each mark is investigated, you will unlock a new Research to send your team on. You can discover and complete the Research one at a time or check all the markings then complete all the Research expeditions.
- After your expeditions have returned, examine the marks again.
Congratulations, Mystery complete!
- Requirements:
- 100 Archaeology
- Completion of Out of the Crucible
- Dig Site: Warforge
- Required Item(s):
- Rewards: 37,000 Archaeology experience
Completion of this Mystery will also complete the "You Have Chosen..." Achievement.
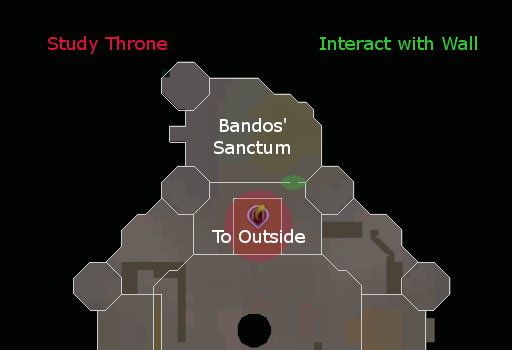
- Study Bandos' throne, just beneath you as you enter Warforge, and you will uncover the "Power Behind the Throne" Research. Complete the expedition and return to the throne.
- Use a repaired 'Forged in War' sculpture on the throne then interact with the wall to the East. This will inform you that you need the Chosen One.
- Speak with Zanik, give her a Dorgeshuun spear, and speak with her again.
- Return to the wall and interact with it to pass it and enter Bandos' Sanctum
Congratulations, Mystery complete!
- Requirements: 101 Archaeology
- Dig Site: Orthen
- Required Item(s):
- Dinosaurs 101
- Next of Kin
- Cosmic Ordering
- Pain! It! Black!
- Rewards: 39,500 Archaeology experience
Completion of this Mystery will also complete "Death Watch" Achievement.
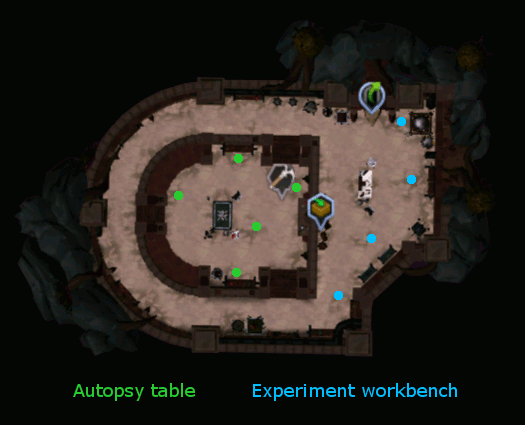
- Excavate at one of the following Hotspots to obtain the pages.
- Autopsy table (Level 101)
- Experiment workbenches (Level 102)
- Once you have obtained the pages, speak with Mr. Mordaut, at the Anachronia Base Camp.
Congratulations, Mystery complete!
- Requirements: 105 Archaeology
- Dig Site: Everlight
- Required Item(s):
- Dominion torch
- Dominion torch (damaged)
- Everlight silvthril x 20
- Goldrune x 12
- Orthenglass x 12
- Star of Saradomin x 18
- 'Hallowed Be the Everlight' painting
- 'Hallowed Be the Everlight' painting (damaged)
- Cobalt blue x 52
- Samite silk x 16
- Vellum x 16
- White oak x 16
- Mosaic pieces x 300
- Dominion torch
- Rewards: 49,000 Archaeology experience
Completion of this Mystery will also complete the "Hallowed Be..." Achievement.
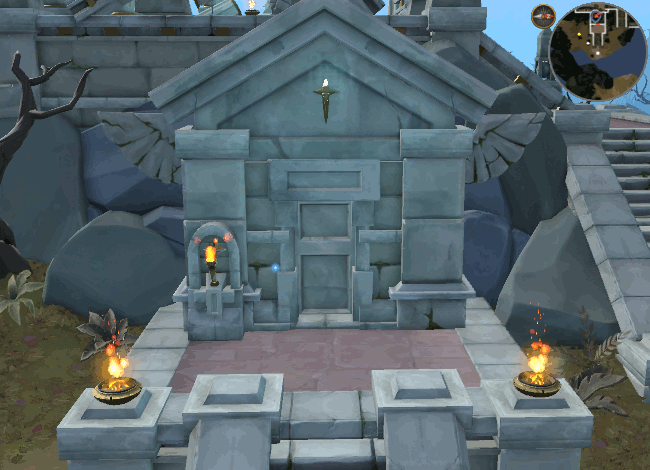
Click image to see entry area.
- Travel to the Acropolis of Everlight. On the East side you will notice a door with a sconce next to it. Use a repaired Dominion torch on the sconce then light it to access the Cavern.
- Enter the Cavern, climb down the edge, then walk to the Nothern end. Here you will need to climb into the damaged mosaic and dive into the water on the East side.
- Study the large mechanism in the middle of the area to unlock the "Like Clockwork" Research.
- Locate a cog on the South, West, and North sides of the mechanism (closer to the outer walls) and use them on the broken areas that are at the base of the mechanism on the South, West, and North sides. Note that you can only carry 1 cog at a time.
- Exit the water via the bubbles to the East. Repair each one of the broken mosaic tiles. Once it is fully fixed, activate the elevator and travel up on it.
Congratulations, Mystery complete!
- Requirements:
- 105 Archaeology
- Completon of Hallowed Be...
- Dig Site: Everlight
- Required Item(s):
- Kantharos cup
- Everlight silvthril x 30
- Orthenglass x 36
- Sapphire x 1
- Hetairoi buckler
- Optimatoi buckler
- Prodromoi buckler
- Psiloi buckler
- Kantharos cup
- Rewards: 49,000 Archaeology experience
Completion of this Mystery will also complete "The Everlight" Achievement.
- Repair Padosan's statue (10 White marble and a repaired Dominion torch) if you have not done so yet at Everlight. Doing so, you will be able to claim a Gold Dominion metal from the statue.
- Travel to Falador and give the medal to Pandomenes. In exchange for the medal, he will inform you that a Kantharos cup will need to be used to harness the Everlight.
- With a repaired Kantharos cup and your 4 bucklers, travel to the Everlight Cavern and take the elevator to the top.
- When at the top, use the bucklers on the walls. They will automatically be added to the correct wall
- North - Hetairoi
- East - Psiloi
- South - Prodromoi
- West - Optimatoi
- Placing the bucklers will present you with a 3x3 puzzle where you want to move the 4 pillars around to light up the bucklers. You will be pushing the columns to specific locations so you will need to stand on a specific side of the map. Position your map facing North and interact with the column at the indicated tile to push it the direction the arrow shows. Solution is as follows:
Step Push from... Image Step Push from... Image One North 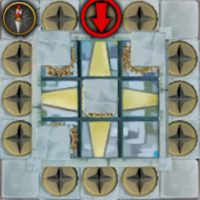
Two South 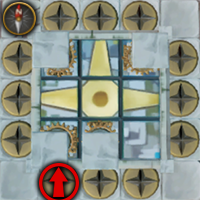
Three East 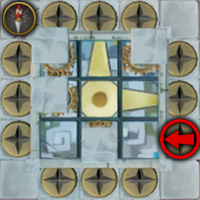
Four West 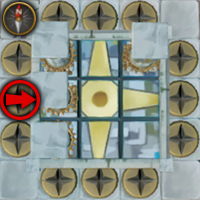
Five North 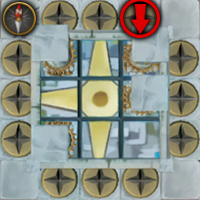
Six East 
Seven West 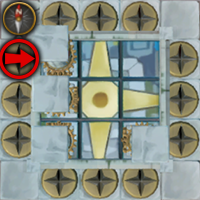
Eight South 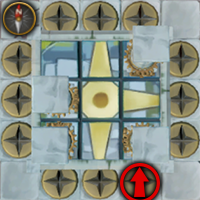
Nine East 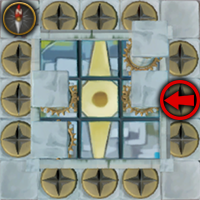
Ten West 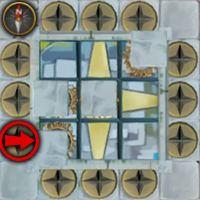
Eleven South 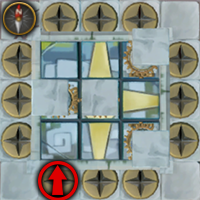
Twelve East 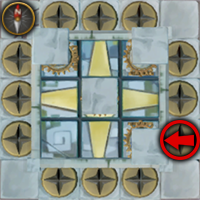
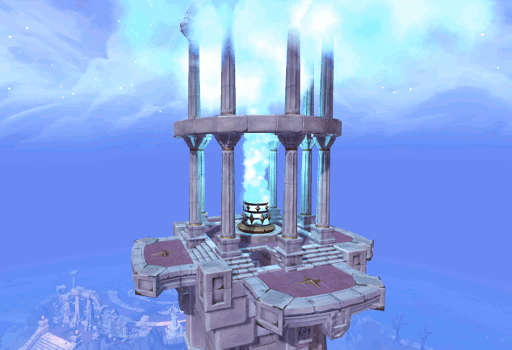
- Activate the elevator again and ascent to the roof. Claim the Everlight to obtain the Cup of Nectar.
Congratulations, Mystery complete!
- Requirements: 106 Archaeology
- Dig Site: Orthen
- Required Item(s):
- Raksha
- Ethical Concerns
- Higher States
- Moksha
- Rewards: 51,500 Archaeology experience
Completion of this Mystery will also complete "Free Your Mind" Achievement.

- Excavate at one of the following Hotspots to obtain the pages.
- Aughra remains (Level 106)
- Moksha device (Level 108)
- Once you have obtained the pages, speak with Mr. Mordaut, at the Anachronia Base Camp.
Congratulations, Mystery complete!
- Requirements:
- 107 Archaeology
- Completion of Prison Break
- Dig Site: Kharid-et
- Required Item(s): Commander's log pages (1, 2, 3, 4, 5, & 6)
- Rewards: 54,000 Archaeology experience
Completion of this Mystery will also complete the "Decimation" Achievement.
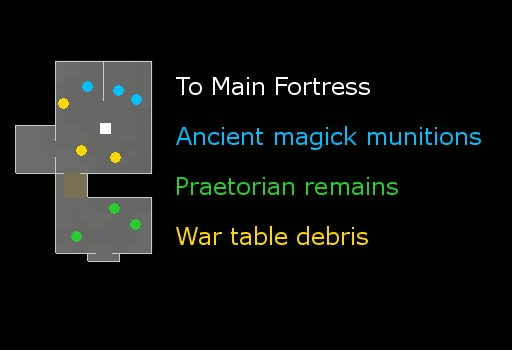
- Excavate at one of the following Hotspots, found within the War Table, to obtain the log pages.
- Ancient magick munitions (Level 107)
- Praetorian remains (Level 114)
- War table debris (Level 118)
- Once you have obtained the log pages, speak with Dr. Nabanik, Outside the dig site.
Congratulations, Mystery complete!
- Requirements:
- 107 Archaeology
- Completion of Prison Break
- Dig Site: Kharid-et
- Required Item(s): Praetorian's log pages (1, 2, 3, 4, & 5)
- Rewards: 54,000 Archaeology experience
Completion of this Mystery will also complete the "Shadow Fall" Achievement.

- Excavate at one of the following Hotspots, found within the War Table, to obtain the log pages.
- Ancient magick munitions (Level 107)
- Praetorian remains (Level 114)
- War table debris (Level 118)
- Once you have obtained the log pages, speak with Dr. Nabanik, Outside the dig site.
Congratulations, Mystery complete!
- Requirements:
- 107 Archaeology
- Completion of Prison Break
- Completion of Time Served
- Dig Site: Kharid-et
- Required Item(s):
- Pontifex signet ring (toolbelt will work)
- Legatus pendant (toolbelt will work)
- Portable phylactery
- Rewards: 54,000 Archaeology experience
Completion of this Mystery will also complete "The Forgotten Prisoner" Achievement.
Click image to see the prisoner's area.
- Enter the Vault via the door on the Eastern side of the Prison Block. Once in the Vault, cross the barrier to the North and interact with the strange device.
- The spirit within the device will have several questions which it requires answers for
- Who am I? - Xil'gar Trog. (option 4)
- What am I? - A demon soul (option 2)
- Where am I? - You're in pirson. (option 5)
- Why am I here? - You committed treason. (option 1)
- With his questions answered, Xil'gar will remember who he is and the steps he took to keep his sanity. He will then request your assistance in freeing him from the strange device. You are able to ask him several questions about what he wanted and why you should help him.
- If you have a Portable phylactery with you, you will be given the opportunity to transfer him from the strange device to it. Agree to his contract terms and you will transfer his soul.
Congratulations, Mystery complete!
- Requirements:
- 107 Archaeology
- Completion of Time Served
- Dig Site: Kharid-et
- Required Item(s):
- Pontifex signet ring (toolbelt will work)
- Legatus pendant (toolbelt will work)
- 'Incite Fear' spell scroll
- 'Exsanguinate' spell scroll
- 'Smoke Cloud' spell scroll
- 'Animate Dead' spell scroll
- Rewards:
- 2,500 Archaeology experience (Ice button - Level 58)
- 5,000 Archaeology experience (Blood button - Level 86)
- 7,500 Archaeology experience (Smoke button - Level 100)
- 10,000 Archaeology experience (Shadow button - Level 107)
- 25,000 Divination
- 30,000 Archaeology experience
Completion of this Mystery will also complete "The Vault of Shadows" Achievement. Note that the Mystery and Achievement can also be completed via the Miniquest at level 58 Archaeology.
Click image below for view of button location.
Requires:
'Incite Fear' spell scroll and Legatus pendant (toolbelt, inventory, or worn)
Instructions:
- Enter the Vault via the door on the Eastern side of the Prison block. Once inside, walk South to the dial on the West wall, between the Southern room and the ruined door.
- Cast the 'Incite Fear' spell (click the scroll) then click the dial to teleport to the puzzle area. Within the room you will find a set of 9 dials and the Trindine (located on the center dial) on the floor. Set your camera to face North then activate the dials as follows.
Note: to move a dial backwards, you will need to right click and select "Dial back".
If you turn the dial the wrong direction or hit the wrong dial, it is possible to correct it and continue by turning the dial the correct direction the same number of times you went the wrong way, then moving it farther the correct direction as needed. For example: if you turned it forward once instead of backwards, turn it backwards once to negate the wrong direction then turn it backwards once more to input the correct combination step. If you mess up or get confused and need to reset, this can be done by leaving the room and re-entering by pressing the Ice button (the dial where you read the spell scroll).
Dial Direction Number of Rotations North East Forward 1 East Forward 1 North East Backward 1 South West Backward 1 South Forward 2 South East Forward 2 Center Forward 1 North Backward 1 South Backward 1 West Forward 1 North West Forward 1 - Once the puzzle has been solved, the door will open and you will obtain Praetor's log page 2 as well as 2,500 Archaeology experience. You can now leave the area.
Click image below for view of button location.

Requires:
'Exsanguinate' spell scroll and Pontifex signet ring (toolbelt, inventory, or worn)
Instructions:
- Enter the Main Fortress area and enter the chapel to the South East. On the North wall, to the East of the broken stairs, is the next dial.
- Cast the 'Exsanguinate' spell (click the scroll) then click the dial to teleport to the puzzle area. Within the room you will find a set of 5 dials on the floor. Set your camera to face North then activate the dials as follows.
Note: to move a dial backwards, you will need to right click and select "Dial back".
If you turn the dial the wrong direction or hit the wrong dial, it is possible to correct it and continue by turning the dial the correct direction the same number of times you went the wrong way, then moving it farther the correct direction as needed. For example: if you turned it forward once instead of backwards, turn it backwards once to negate the wrong direction then turn it backwards once more to input the correct combination step. If you mess up or get confused and need to reset, this can be done by leaving the room and re-entering by pressing the Blood button (the dial where you read the spell scroll).
Dial Direction Number of Rotations South West Backward 1 Center Forward 1 North West Forward 2 South West Backward 1 Center Backward 2 North East Forward 1 South East Forward 1 Center Backward 1 North East Backward 2 Center Backward 2 North East Backward 1 Center Backward 1 South West Backward 1 South East Forward 1 Center Forward 1 South East Forward 1 Center Forward 1 South East Forward 1 South West Forward 1 Center Forward 1 South West Backward 1 Center Forward 2 - Once the puzzle has been solved, the door will open and you will obtain Praetor's log page 3 as well as 5,000 Archaeology experience. You can now leave the area.
- Leaving via the boat will take you out to the bank of the river located near the Dominion Tower and will complete the Aquatic Escape Achievement.
Click image below for view of button location.
Requires:
Instructions:
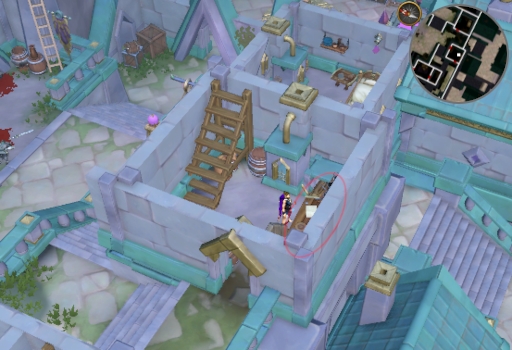
- Enter the Main Fortress area and walk to the room North of the chapel, where the oven is found. On the Western wall, South of the crates, is the next dial.
- Cast the 'Smoke Cloud' spell (click the scroll) then click the dial to teleport to the puzzle area. Within the room you will find a set of 8 dials on the floor. Set your camera to face North then activate the dials as follows.
Note: For this puzzle, you will only be moving the dials forward, however, it may be necessary to reverse one if you have clicked the wrong dial by accident. To move a dial backwards, you will need to right click and select "Dial back".
If you turn the dial the wrong direction or hit the wrong dial, it is possible to correct it and continue by turning the dial the correct direction the same number of times you went the wrong way, then moving it farther the correct direction as needed. For example: if you turned it forward once instead of backwards, turn it backwards once to negate the wrong direction then turn it backwards once more to input the correct combination step. If you mess up or get confused and need to reset, this can be done by leaving the room and re-entering by pressing the Smoke button (the dial where you read the spell scroll).
This puzzle has been broken down into a series of steps within each step. This is because there is a total of 46 times you will be pressing buttons
Group First Second Third Fouth Fifth Sixth Seventh One C D 4 4 2 1 1 Two 1 D C D D 4 4 Three D D D 4 4 2 2 Four D 2 2 3 1 C C Five C D 1 D D D 3 Six 3 3 1 1 1 D D Seven D 1 1 1 - Once the puzzle has been solved, the door will open and you will obtain Praetor's log page 4 as well as 7,500 Archaeology experience. You can now leave the area.
Click image below for view of button location.
Requires:
'Animate Dead' spell scroll and the ability to enter the War room (wearing a Ring of visibility or have claimed Sliske's gift to see the Shadow Realm (requires completion of Fate of the Gods) AND the Pylons must be active or you must have activated all 8 Anchors).
Instructions:
- Enter the War room via the Praetorium war table found within the Main Fortress. On the West wall, in the Western most room, is the next dial.
- Cast the 'Animate dead' spell (click the scroll) then click the dial to teleport to the puzzle area. Within the room you will find a set of 5 dials on the floor. Set your camera to face North then activate the dials as follows.
Note: to move a dial backwards, you will need to right click and select "Dial back".
If you turn the dial the wrong direction or hit the wrong dial, it is possible to correct it and continue by turning the dial the correct direction the same number of times you went the wrong way, then moving it farther the correct direction as needed. For example: if you turned it forward once instead of backwards, turn it backwards once to negate the wrong direction then turn it backwards once more to input the correct combination step. If you mess up or get confused and need to reset, this can be done by leaving the room and re-entering by pressing the Shadow button (the dial where you read the spell scroll).
Dial Direction Number of Rotations C Forward 2 E Backward 1 C Backward 2 E Backward 1 A Backward 1 D Forward 2 B Forward 1 E Backward 1 C Backward 1 E Forward 1 A Backward 1 C Forward 2 A Forward 1 D Backward 1 C Backward 1 D Backward 1 C Forward 2 B Forward 2 C Forward 2 - Once the puzzle has been solved, the door will open and you will obtain 10,000 Archaeology experience.
- You will now be able to obtain the Shadow engrammeter (depleted) found within the center of the Vault. Obtain this then collect 500 of one of the following memory types (level 60+) to fill it:
- When the Shadow engrammeter is full, return to the center of the Vault. Once here, operate it to obtain Trindine's memory.
- Visit Dr. Nabanik and show it to him to receive the memory in book form as well as 25,000 Divination experience.
- Ensure that you have your Ring of visibility equipped (or have obtained Sliske's gift), that you have either activated all of the Anchors, or that the Pylons are active, then return once more to the center of the Vault. Here you should find Trindine, speak with her.
Congratulations, Mystery complete!
- Requirements:
- 108 Archaeology
- 86 Hunter
- Completion of Know Thy Measure
- Dig Site: Orthen
- Required Item(s):
- Master control
- Singing bowl
- Rope
- Small fishing net (toolbelt item will NOT work)
- Rewards: 56,500 Archaeology experience
Completion of this Mystery will also complete the "Fragmented Memories" Achievement.
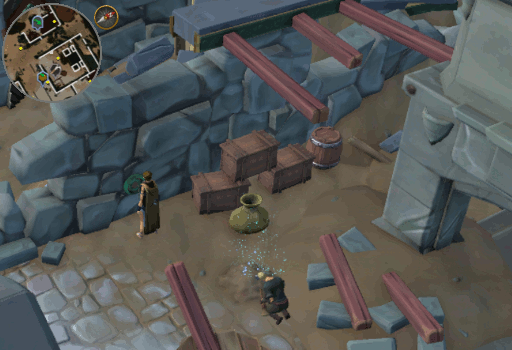
- Travel to the Moksha Ritual Site and investigate the Central Platform on the Moksha device at the center of the dig site to unlock the Mystery.
- Excavate and restore a Singing bowl and Master control, if you have not brought them with you. Once you have the restored items, use the Master control on the Central Platform or, if you had brought it with you, simply continue through the dialog until you are prompted to use the Master control on it (choose yes - option 1).
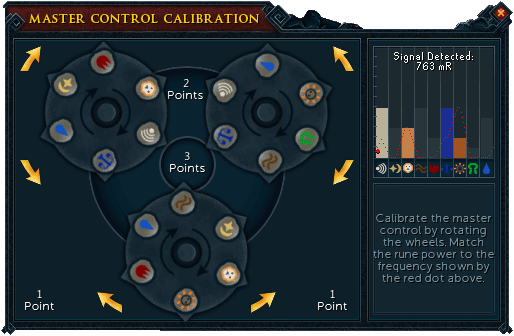
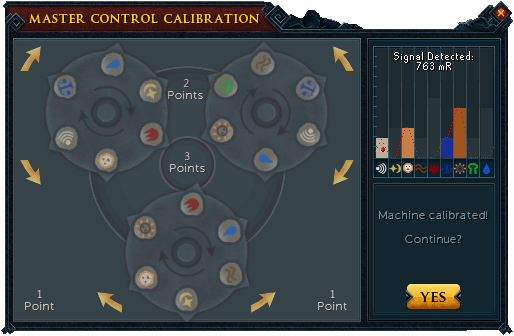
- To solve the puzzle, you will need to rotate the dials to adjust the bars on the right side of the interface. These bars will need to align with the lines in the same graph. Each rune will be worth 1, 2, or 3 points depending on which direction it is facing. You will need to solve this puzzle 3 times to complete calibration. It is recommended to begin with the rune with the lowest bar needed first (Air rune in example below) as it is typically only located on 2 dials. Once you have it in the correct spot, you should mainly need to move the last dial (though this will not ALWAYS be the case). Click image below to see a solved puzzle.
- With the puzzle solved, the device will whirl to life. Interact with the device again and continue through the dialog, choose yes (option 1) when prompted to try and use the device then comtinue through the entire dialog.
- Step outside of the Moksha Ritual Site and walk to the Yellow salamander Hunting grounds just South of it. With the Singing bowl, Rope, and Small fishing net in your inventory, 'set-trap' on a young tree to catch a Tranquil yellow salamander.
- Once you have the Tranquil yellow salamander, return to the Moksha device in the Moksha Ritual Site and use it on the Central platform. You will look at eachother in anticipation before Professor Alfredo will walk over to assist and a cutscene will begin. Continue through the dialog until there is no more.
Congratulations, Mystery complete!
Note that you can speak with Associate Colette to learn more about how Professor Salamander and Professor Alfredo (salamander) are doing.
- Requirements:
- 110 Archaeology
- Completion of Out of the Crucible
- Dig Site: Warforge
- Required Item(s):
- Farewell to Kili
- Bertha
- The Bronze Age
- Rockfish Pie
- For Peat's Sake
- Rewards: 62,000 Archaeology experience
Completion of this Mystery will also complete the "Heart of the Forge" Achievement.
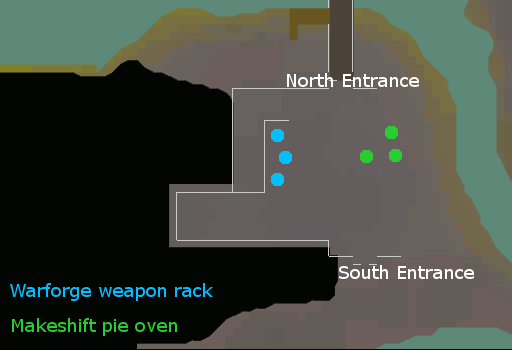
- Excavate at one of the following Hotspots to obtain the journal pages.
- Warforge weapon rack (Level 110)
- Makeshift pie over (Level 119)
- Once you have collected all 5 pages, speak with Zanik, Outside the dig site.
Congratulations, Mystery complete!
- Requirements: 113 Archaeology
- Dig Site: Orthen
- Required Item(s):
- The One Above All
- Father of Dragons
- Raksha Observations
- One... Voice...
- Rewards: 67,000 Archaeology experience
Completion of this Mystery will also complete "I Am Become Death" Achievement.
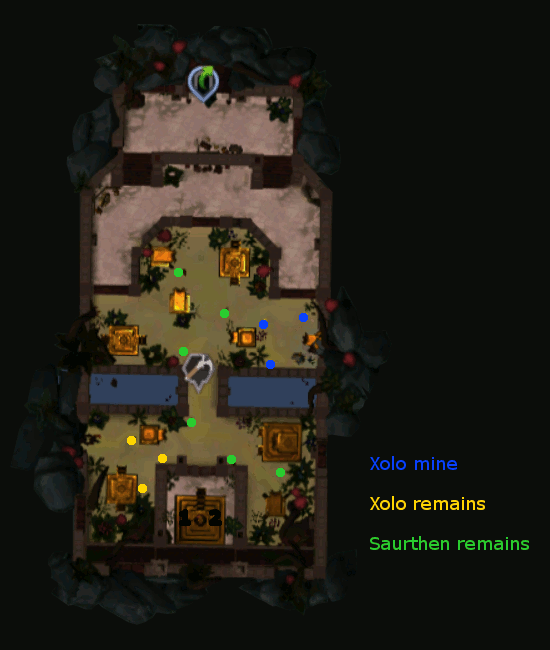
- Excavate at one of the following Hotspots to obtain the pages.
- Xolo mine (Level 113)
- Xolo remains (Level 119)
- Saurthen debris (Level 120)
- Once you have obtained the pages, speak with Mr. Mordaut, at the Anachronia Base Camp.
Congratulations, Mystery complete!
- Requirements:
- 120 Archaeology
- Completion of Fragmented Memories
- Dig Site: Orthen
- Required Item(s):
- Rewards:
- 67,000 Archaeology experience
- 150 additional Monolith energy
Completion of this Mystery will also complete "Mysterious City" Achievement.
- Travel to Xolo City entrance (Nouth of Laniakea) and investigate the door to unlock the Mystery. If you have not yet obtained and restored a Lingam stone (damaged), return to Moksha Ritual Site and obtain one. If you brought one with you, simply continue the dialog to enter the area. Note that the Lingam stone will be consumed and the door unlocked, you will no longer need one to enter in the future.
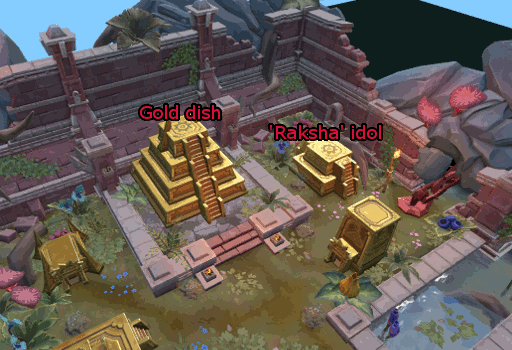
- Excavate the Saurthen debris (120 Archaeology) Hotspots to obtain and restore a 'Raksha' idol and Gold dish.
- Place the restored Gold dish on the Xolo temple pyramid at the South end of the site.
- Place the restored 'Raksha' idol on the Xolo building West of the temple pyramid.
- Return to the Archaeology Campus and interact with the Monolith.
Congratulations, Mystery complete!
This Special Report was written by ChathMurrpau. Thanks to 3ter 1, Zandahar, Rinarth, Quick Art, and Frostaux for corrections.
This Special Report was entered into the database on Sat, Apr 25, 2020, at 04:53:56 PM by Chath, and it was last updated on Tue, Jul 25, 2023, at 01:18:00 AM by Chath.
If anything is incorrect or missing, or if you have any new information to submit to this database, please submit it to us on our Content Submissions Forums.
If you see this guide on any other site, please report it to us so we can take legal action against anyone found stealing our content. This guide is copyrighted by RuneHQ, and its use on other sites is expressly forbidden. Do not ask if you can use our guides or images, the answer is and always will be NO!
Print this page with images - Back to the Special Report Index Page - Back to Top
